
RFID Hacking with an MFRC522 and an ESP-8266
Reading Time: 8 minutes
My high school recently installed a new RFID security system for all the doors of classrooms and the auxiliary doors of the school buildings and the cafeteria. While not only being extremely inconvenient as we have to wait until 7:45 in the morning for security to disable the auxiliary doors magentic locks so we can freely leave the school, leaving the building is a hassle because the doors are locked both ways, effectively locking us students inside. Students have ID cards but it’s only used for identification rather than unlocking doors and what not so I got an idea: what if I legally found a way to open a school door without waiting for a teacher to let me in or out.


(Un)fortunately for me, the week that school admin setup the security system, they removed the whole system as it was becoming a hassle for faculty and students alike but my idea still persisted. I got to work and decided to practice legally cloning my apartment access card which also accidentally happened to lead me to legally clone a teacher’s ID card.
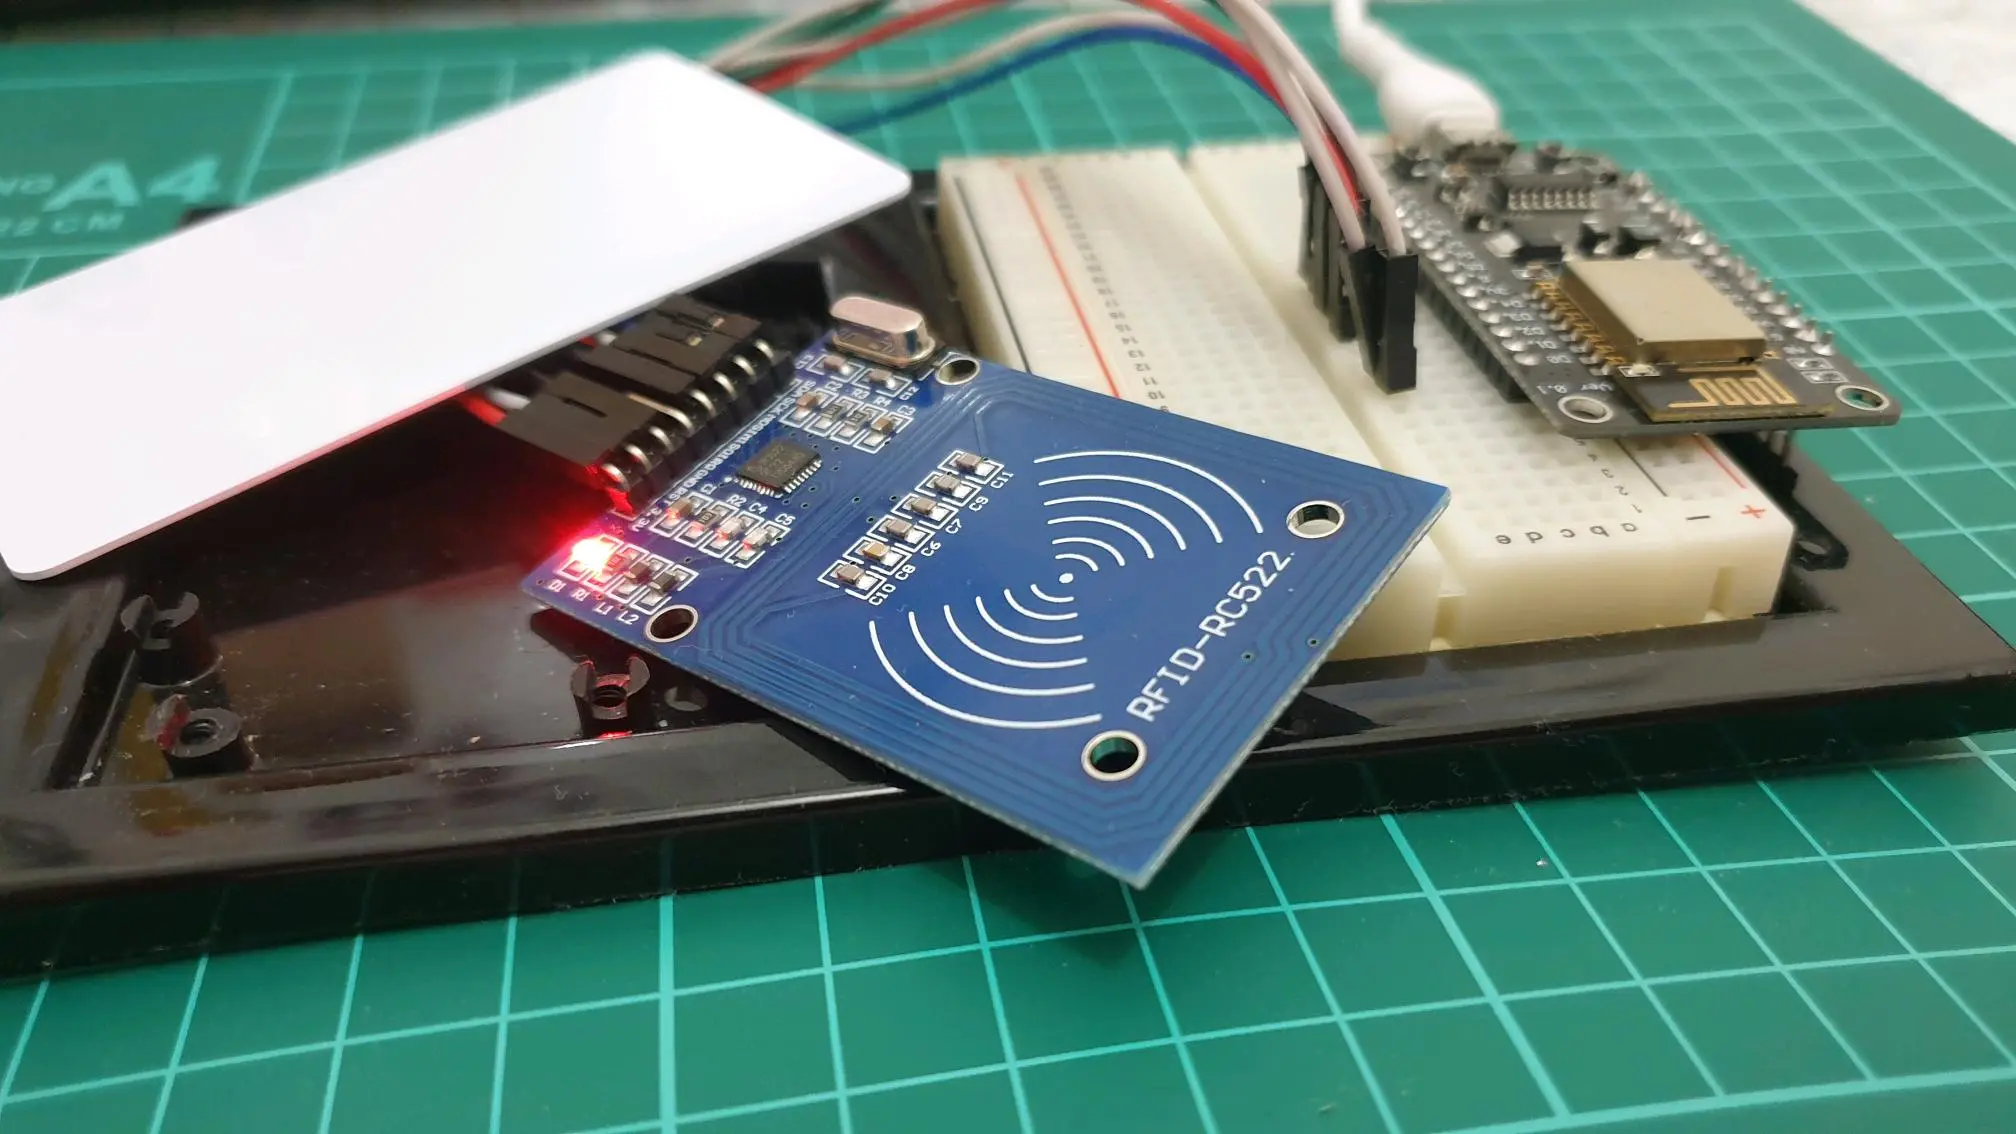
Anyways, to do that, I ordered a MFRC522 module (the blue module on the right) from Amazon which is a 13.56MHz ISO/IEC 14443 MIFARE RFID Reading/Writing module with came bundled with a singular RFID card and RFID tag. Admittedly, the MFRC522 module I bought was quite cheap and I had a few doubts about its reliability but dodgy Chinese electronics products from Amazon work 95% of the time anyways so it really wasn’t a huge concern.
I was split on either using an Arduino Uno or ESP8266 (the black module on the right) but decided on using an ESP-8266 in the end. The ESP-8266 is one of the best microchips out there and, in my opinion, outshines its succesor, the ESP-32, the Arduino Nano and maybe even the Raspberry Pi Pico. It’s cheap, its powerful and definitely the best pocket-sized option out there.
I had a three-pack of really low-end NodeMCU ESP8266 v3.0 from Lolin which I bought for another project and had one leftover which I used. I highly recommend you to use something slightly on the higher end on the ESP8266 such as HiLetGo but the Lolin ones work perfectly.
Looking for the best electronic modules
Going on a tangent here but spending a few bucks could save you from a headache fixing a DOA electronic or trying to download weird drivers that are so niche that you’d need to go on page 13 of Google trying to find it. Either way, the best way to do things is to buy a slightly-more-expensive-than-the-cheapest-option on Amazon or eBay. Make sure to read the reviews too: a straight 5-star electronic with AI-generated reviews is more likely to be worse and way less trustworthy than a 3.9-star review with genuine human text with complaints, praises and photos.
Just a quick heads-up, the first thing you’ll see in serial once you run the program on a low-end ESP8266 or a v2.x ESP8266 is:
";ll��|�d�|
�d�#<����r�c�c��go�lo'���c
x��d{l;dx�g�"
(May not show up in some browsers but it’s supposed to show missing characters!)
You should
- Type enter on the terminal
- Scan your card
- Check that your baud rate is correct (115200 baud)
Soldering the MFRC522
The MFRC522 I bought was unsoldered and I didn’t have a solder handy so I borrowed a friend’s cheap solder. This was the 5% of the time where electronics from China don’t work well and i’d spend slightly a bit more just to get a slightly more expensive but high-quality solder. I’m not the best solder so here’s a video of someone soldering their MFRC522.
Wiring and Code
Wiring the RC522 with the ESP8266 was dodgy and took me around 3 days to get right. One big issue was the Lolin ESP8266 apparently only being able to run on 9600 baud while the RC522 runs exclusively on 115200 baud. I’m certain that the Lolin ESP8266 just have a printing error because it works on both 115200 and 9600 baud outputs. Just note that the console needs to run on 115200 baud to see any outputs.

Wiring the RC522 is straightforward. The code below (and on my GitHub) follows the wiring above. A higher resolution image can be seen in the GitHub page of this project. But before we can run, we need to walk and before we can clone cards, we need to read cards.
This code comes from the MFRC522 library by Miguel Balboa. I know. Skiddie.
#include <SPI.h>
#include <MFRC522.h>

constexpr uint8_t RST_PIN = 5;
constexpr uint8_t SS_PIN = 4;

MFRC522 rfid(SS_PIN, RST_PIN); // Instance of the class

MFRC522::MIFARE_Key key;

// Init array that will store new NUID
byte nuidPICC[4];

void setup() {
  Serial.begin(115200);
  SPI.begin(); // Init SPI bus
  rfid.PCD_Init(); // Init MFRC522

  for (byte i = 0; i < 6; i++) {
    key.keyByte[i] = 0xFF;
  }

  Serial.println(F("This code scan the MIFARE Classsic NUID."));
  Serial.print(F("Using the following key:"));
  printHex(key.keyByte, MFRC522::MF_KEY_SIZE);
}

void loop() {

  // Look for new cards
  if ( ! rfid.PICC_IsNewCardPresent())
    return;

  // Verify if the NUID has been readed
  if ( ! rfid.PICC_ReadCardSerial())
    return;

  Serial.print(F("PICC type: "));
  MFRC522::PICC_Type piccType = rfid.PICC_GetType(rfid.uid.sak);
  Serial.println(rfid.PICC_GetTypeName(piccType));

  // Check is the PICC of Classic MIFARE type
  if (piccType != MFRC522::PICC_TYPE_MIFARE_MINI &&
    piccType != MFRC522::PICC_TYPE_MIFARE_1K &&
    piccType != MFRC522::PICC_TYPE_MIFARE_4K) {
    Serial.println(F("Your tag is not of type MIFARE Classic."));
    return;
  }

  if (rfid.uid.uidByte[0] != nuidPICC[0] ||
    rfid.uid.uidByte[1] != nuidPICC[1] ||
    rfid.uid.uidByte[2] != nuidPICC[2] ||
    rfid.uid.uidByte[3] != nuidPICC[3] ) {
    Serial.println(F("A new card has been detected."));
    rfid.PICC_DumpToSerial(&(rfid.uid));

    // Store NUID into nuidPICC array
    for (byte i = 0; i < 4; i++) {
      nuidPICC[i] = rfid.uid.uidByte[i];
    }

    Serial.println(F("The NUID tag is:"));
    Serial.print(F("In hex: "));
    printHex(rfid.uid.uidByte, rfid.uid.size);
    Serial.println();
    Serial.print(F("In dec: "));
    printDec(rfid.uid.uidByte, rfid.uid.size);
    Serial.println();
  }
  else Serial.println(F("Card read previously."));

  // Halt PICC
  rfid.PICC_HaltA();

  // Stop encryption on PCD
  rfid.PCD_StopCrypto1();
}


// Dumps hex values.
void printHex(byte *buffer, byte bufferSize) {
  for (byte i = 0; i < bufferSize; i++) {
    Serial.print(buffer[i] < 0x10 ? " 0" : " ");
    Serial.print(buffer[i], HEX);
  }
}


// Dumps decimal values.
void printDec(byte *buffer, byte bufferSize) {
  for (byte i = 0; i < bufferSize; i++) {
    Serial.print(buffer[i] < 0x10 ? " 0" : " ");
    Serial.print(buffer[i], DEC);
  }
}
We can read UIDs now! But now we need to clone the cards. The code below is able to clone code based on a user-input UID
This code is based on ChangeUID.c in Miguel Balboa’s library but was written by me.
#include <SPI.h>
#include <MFRC522.h>
#define NEW_UID {0xE7, 0xB6, 0xB8, 0x8D} // Code to change
constexpr uint8_t RST_PIN = 5;
constexpr uint8_t SS_PIN = 4;
MFRC522 mfrc522(SS_PIN, RST_PIN); // Instance of the class

MFRC522::MIFARE_Key key;

void setup() {
	Serial.begin(115200);
	while (!Serial);
	SPI.begin(); // Init SPI bus
	mfrc522.PCD_Init(); // Init MFRC522 card

// Sets all hex bit values to FFFF...
	for (byte i = 0; i < 6; i++) {
		key.keyByte[i] = 0xFF;
	}
}

void loop() {
	if ( ! mfrc522.PICC_IsNewCardPresent() || ! mfrc522.PICC_ReadCardSerial() ) {
		delay(50);
		return;
}

	// Prints Current UID
	Serial.print(F("Card UID:"));
	for (byte i = 0; i < mfrc522.uid.size; i++) {
		Serial.print(mfrc522.uid.uidByte[i] < 0x10 ? " 0" : " ");
		Serial.print(mfrc522.uid.uidByte[i], HEX);
	}

	Serial.println();
	byte newUid[] = NEW_UID;

if ( mfrc522.MIFARE_SetUid(newUid, (byte)4, true) ) {
	Serial.println(F("Wrote new UID to card."));
}

// Halt PICC and re-select it so DumpToSerial doesn't get confused
mfrc522.PICC_HaltA();

if ( ! mfrc522.PICC_IsNewCardPresent() || ! mfrc522.PICC_ReadCardSerial() ) {
	return;
}

// Dump the new memory contents
Serial.println(F("New UID and contents:"));
mfrc522.PICC_DumpToSerial(&(mfrc522.uid));
delay(2000);
}
Result!
Unfortunately, the RFID card and tag that came with the MFRC522 were only readable despite the fact they were clearly advertised as being read-write. That was a small roadblock as I had to order another 5-pack of true read-writeable RFID tags. Make sure to buy the 13.56MHz tags as well! They’re cheap on Amazon (but way more expensive than a Lolin ESP8266).
But all in all, reading, cloning and writing the card worked! I made this small video showcasing how it all worked.
[VIDEO OF RFID CARD COMING SOON]
Future Stuff
One big thing I really want to add is the ability to write the card UID into the ESP8266 to be read from by a phone connected to the ESP8266 through its wifi capabilities. This makes the process of legally scanning cards way more intuitive and hacker-y.
This was a really fun side project that spiraled into something more than being a harmful script kid attacking their school’s security system. I must stress that cloning cards that aren’t yours could possibly be illegal in other countries and I don’t condone anyone trying to break into buildings or clone ID cards unless the ID card is legally yours.
Have fun :)